India Visa photo guide
India Visa photo background, glasses, and face visibility
Review plain white or light background, no shadows, no glasses for e-Visa, full face visibility, hair and head-covering cautions, and why over-editing can create problems.
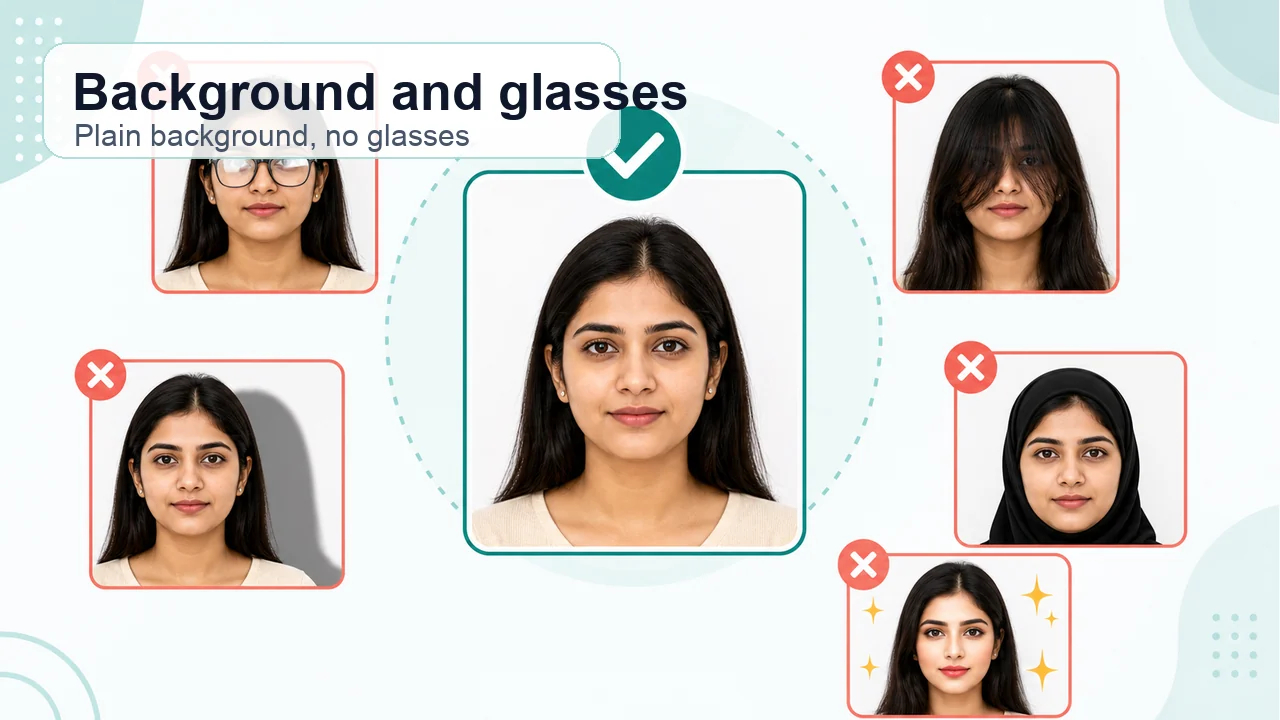
Key points
- White or plain light background
- No shadows, no glasses for e-Visa
- Keep hair and face covering from hiding features
Background and shadows
Use a white or plain light background and avoid shadows on the face or background. If you edit the background, avoid unnatural edges or heavy retouching. Wall stains, curtain patterns, and shoulder shadows are easy to miss, so review the saved image at a large size.
- Avoid wall or fabric patterns
- Do not leave one side of the face dark
- Remove shoulder or hair shadows from the background
Glasses, hair, and head coverings
The e-Visa guidance states without spectacles. Keep eyes and face outline visible; for hats or head coverings, confirm how your actual route handles them. Even clear lenses without glare should be treated cautiously because the e-Visa guidance says no spectacles.
Signs you should retake the photo
If background cleanup made the face outline unnatural, hair covers the eyes, glasses marks remain, or the head is tilted, a retake is usually safer than more editing.
- Jagged or cut-out face outline
- Eyes hidden by hair or shadow
- White background but dark face
Official confirmation
Use the official India e-Visa page for e-Visa photos and Indian Visa Online / VSS image guidance for Regular Visa online uploads.
Requirements can change, and printed-photo practice may vary by mission or application center. Always confirm the latest instructions for your actual route.
Common India Visa photo mistakes
Most of these mistakes come from mixing the e-Visa and Regular Visa rules, or from editing the photo too hard. The app is an independent helper and does not guarantee acceptance.
India e-Visa allows up to 1 MB, while Regular Visa online upload uses up to 300 KB. Check your actual route before compressing.
Changing the file extension does not create a real JPEG. Export the image as JPEG and confirm the saved format.
The e-Visa guidance says without spectacles. Remove glasses even when there is no glare.
Strong background replacement can cut the face outline and make the photo look over-edited. A plain background while shooting is safer.
Forcing the file far below the e-Visa 1 MB limit can blur the eyes and face detail. Keep detail clear within the correct size range.
How the app helps
Crop to an equal width and height square and export a real JPEG instead of uploading HEIC.
Review the file size for your route: 10 KB to 1 MB for e-Visa, 10 KB to 300 KB for Regular Visa online.
Check a plain light background, no shadows, and no glasses before saving the final file.
Photo processing happens on your phone. The image is not sent to this website.
shoumei.org is an independent helper tool. It is not a visa application service, is not official, and does not guarantee acceptance or approval.
India Visa photo FAQ
Is it enough to whiten the background with an app?
Check not only the background color but also the face outline, hair edge, shadows, and whether editing looks unnatural. A retake is safer if correction looks heavy.
Can I keep glasses if there is no glare?
The e-Visa guidance says without spectacles. For e-Visa, it is safer to remove glasses regardless of glare.
Will this photo definitely be accepted?
No. The official system, Government of India, mission, or application center makes the final decision.
Do e-Visa and Regular Visa use the same file-size limit?
No. The official e-Visa page lists a 1 MB maximum, while Regular Visa online photo guidance lists a 300 KB maximum.
Do I still need official confirmation for India Visa photo background, glasses, and face visibility?
Yes. Printed-photo size, copy count, and submission-center practice can vary by route and location.
Official references
- Indian Visa Online - India e-Visa Checked: 2026-08-20
- Indian Visa Online - Regular Visa instructions Checked: 2026-07-20
- Indian Visa Online - VSS_IMAGE photo upload guidance Checked: 2026-08-20
Requirements can change, and printed-photo practice may vary by mission or application center. Always confirm the latest instructions for your actual route.
Choose a guide
Create your photo in the browser
Prepare the photo for India e-Visa directly in your smartphone or computer browser. Creating and reviewing are free.
What this tool creates
- the required face photo (for digital upload)
- the document PDF for submission (for document upload)
Review background and face visibility Open the app